
How are solar panels installed?
A professional rooftop installation normally involves a property survey, system design, permission and network checks, safe roof access, mounting equipment, panel fitting, electrical connection, testing and handover. The physical fitting is only one part of the project. This guide explains what homeowners can expect from a conventional grid-connected solar PV installation.
Most people notice the day panels appear on the roof. Much of the work that determines whether the system is suitable happens beforehand: checking the structure, assessing shade, choosing equipment and agreeing how everything will connect.
Understanding the process helps you compare quotations, prepare your home and recognise what a complete handover should include. The examples below use a typical UK home, with England-specific planning information identified separately. Local requirements and the approved system design always take priority.
The solar installation process at a glance
| Stage | What happens | Useful homeowner question |
|---|---|---|
| Survey | Roof, shade, electrical supply and access are assessed | What needs resolving before a firm quote? |
| Design | Panel layout, equipment and cable routes are agreed | What generation assumptions have you used? |
| Approvals | Planning, building and network requirements are checked | Who handles each application or notification? |
| Fitting | Access equipment, mounts and panels are installed | When will scaffolding arrive and leave? |
| Connection and testing | Electrical equipment is connected and commissioned | When will the electricity need switching off? |
| Handover | Controls, documents and aftercare are explained | Who do I contact if something looks wrong? |
1. Start with a survey of the property
A useful survey considers roof direction, usable space, obstructions and shading. It should also consider your electricity use and where supporting equipment could go. A roof photograph can help an initial discussion, but unresolved structural or electrical questions need appropriate investigation.
Collect recent electricity bills and describe when you use the most energy. Tell the assessor about planned changes such as an electric vehicle or heat pump, while distinguishing firm plans from possibilities. That gives the design a clearer purpose than simply filling every available roof space.
Our shade-mapping guide helps you organise observations from ground level. For an outbuilding, also read questions about solar panels on a lightweight shed roof. Bright sunlight does not establish structural suitability.
2. Agree a design and an itemised quotation
The proposal should identify panel models, array size, inverter arrangement and any optional battery. Ask for a drawing showing the proposed layout and equipment positions. Request an explanation of expected generation, including the effects of shade and roof orientation.
Energy Saving Trust recommends comparing quotes from at least three MCS-certified installers. Verify the company’s details rather than relying on a logo in an advertisement. Compare the scope of work as well as the total price.
Ask whether scaffolding, electrical alterations, roof repairs, monitoring and paperwork are included. Agree how unexpected work will be authorised. A written procedure for changes is particularly helpful if the installer discovers a problem that could not be confirmed during the first visit.
If you are exploring broader energy ideas, you can view the separate energy-information offer (affiliate link). We have not tested the product or verified its claims. It is not an installation service or professional design.
3. Check permissions and the grid connection
Planning permission, building regulations and electricity-network requirements are separate matters. In England, some domestic solar installations qualify as permitted development, subject to conditions. Check the Planning Portal guidance and your local authority for the actual property; rules differ elsewhere in the UK.
The building-regulations guidance also addresses structural and electrical considerations. “No planning application needed” does not mean no other checks are necessary. Leasehold, shared-roof and landlord permissions may need separate attention.
The installer should confirm the applicable distribution network operator procedure. National Grid Electricity Distribution’s guidance explains the G99 route for installations outside the relevant G98 criteria. Some systems require agreement before connection; others follow a notification route.
Ask for the chosen route, any export limit and the responsible person in writing. Panel wattage alone is not enough to determine the connection procedure: the inverter and any additional generation or storage must be considered.
4. Prepare the house and arrange safe access
Agree access to the driveway, garden, loft and electrical equipment. Move fragile belongings from agreed work areas and arrange for children and pets to stay clear. Discuss parking, deliveries, neighbour access and where equipment will be stored.
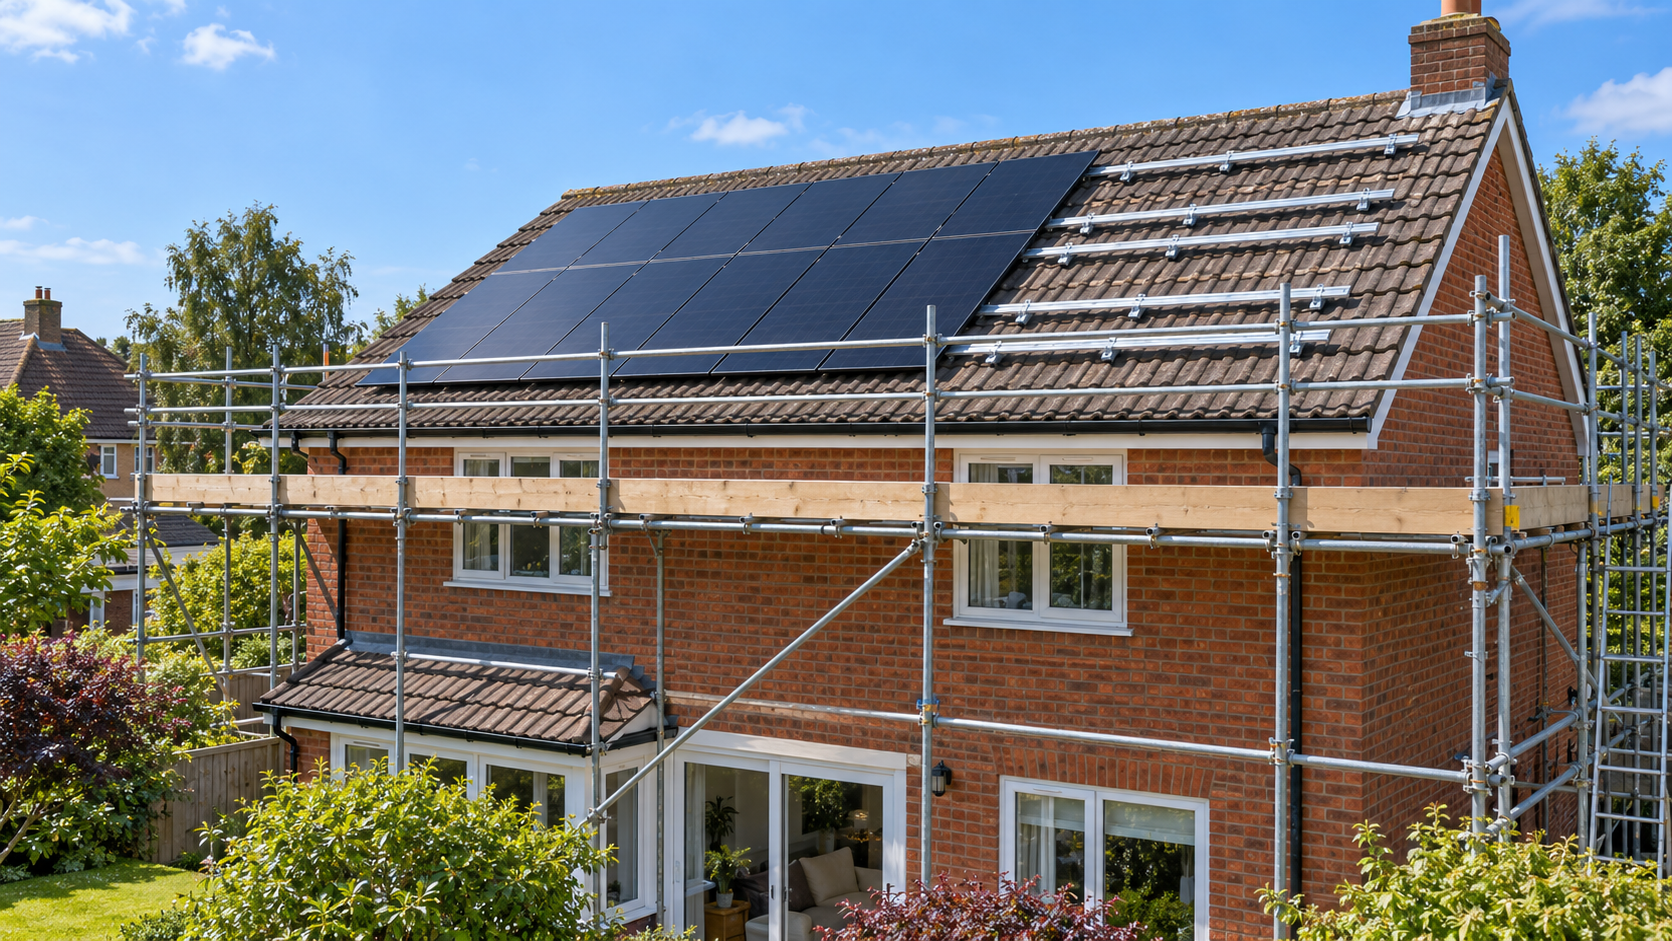
Roof work needs a planned means of preventing falls. Depending on the job, this commonly includes scaffolding and edge protection. The Health and Safety Executive’s work-at-height guidance explains why access and protection must suit the task.
Ask when scaffolding will be erected and removed, and whether adverse weather could change the programme. You do not need to inspect the roof yourself; request photographs and explanations from the contractor when progress needs reviewing.
5. Fit the roof mounting system
On many pitched tiled roofs, installers use a designed arrangement of roof fixings, hooks or brackets and rails. The attachment method must suit both the roof construction and the selected mounting system. Roof coverings are handled and made weather-resistant around the approved fixings.
K2 Systems’ tiled-roof solutions illustrate why there is no single universal bracket for every roof. The supporting structure must deal with the installation’s loads; tiles should not be treated as a generic structural anchoring point.
Flat roofs may use a different support arrangement, sometimes including ballast, subject to design and structural checks. Integrated panels that form part of the roof covering are different again. Ask which system is proposed and how roof integrity and future maintenance have been addressed.
6. Secure the panels and manage the cables
The team positions and secures the modules using the mounting manufacturer’s requirements and the panel maker’s approved fixing locations. Cable management matters too: connections and wiring need appropriate support, protection and routing.
The LONGi module manual provides one manufacturer’s example of mounting, handling and electrical requirements. Instructions for another model may differ. These details belong with qualified installers, rather than a generic set of measurements copied from the internet.
Before the job, agree visible cable routes and any wall penetrations. Afterwards, review the completed appearance from safe ground. Our article on what solar panels are made of explains the components being handled.
7. Install the inverter and electrical equipment
Panels produce direct-current electricity. An inverter converts it into alternating current for ordinary household use. Some designs have a central inverter; others use microinverters at the modules. The US Department of Energy’s system-design overview explains these different arrangements.
The electrician connects the equipment using the protection, switching and wiring required for the approved design. There may be a planned interruption to the house supply. Ask for advance notice, especially if you rely on powered equipment or work from home.
If storage is included, its location and controls need separate consideration. A battery does not automatically mean the house will operate during a power cut. Ask exactly which backup capability, if any, has been designed and included.
Electrical Safety First advises professional installation and maintenance. Panels can produce electricity in daylight, so leave covers, connectors and electrical tests to the installation team.
8. Test, commission and demonstrate the system
Commissioning is the stage at which the installer verifies the completed installation, performs the necessary tests and configures its operation. Ask for confirmation that outstanding defects have been addressed and that any agreed network conditions are implemented.
Have the installer demonstrate normal operation using your own system. Ask which display shows current power, which shows accumulated energy and how alerts appear. If monitoring uses an app, make sure you have the correct account access rather than relying on the installer’s phone.

9. Collect the handover documents
Before the team leaves, agree what you have received and when any remaining documents will arrive. Keep one folder containing the following, as applicable to your installation:
- The final equipment list, model numbers and system layout.
- Operating instructions, warranties and maintenance advice.
- Electrical certification and commissioning records.
- MCS installation certificate where the installation is certified.
- Relevant building-regulations and network paperwork.
- Monitoring access, support contacts and the complaints procedure.
Use the MCS solar PV handover checklist as a discussion aid. Ask who provides each outstanding item and record a date. A functioning app is useful, but it does not replace the installation documents.
10. Arrange export payments and review early performance
Generating surplus electricity does not automatically enrol you in a payment contract. In Great Britain, the Smart Export Guarantee offers payments for eligible metered exports. Suppliers set their tariffs and terms. Northern Ireland has different arrangements.
Confirm what your chosen supplier needs, including metering and certification evidence. Then keep a simple record of operation, alerts and generation. Compare performance over a meaningful period with the installer’s estimates, allowing for weather and seasonal differences.
For optional further reading, the separate energy-information promotion is available here (affiliate link). It does not replace commissioning, an installer’s warranty or technical support.
Frequently asked questions
How long does solar panel installation take?
The roof fitting is only part of the schedule. Surveying, approvals, scaffolding, electrical work and paperwork also take time. Request a property-specific timetable with dependencies and weather allowances.
Will my electricity be switched off?
A planned interruption may be required for electrical work. Confirm the expected timing and tell the installer about any equipment that cannot tolerate an unexpected outage.
Will installing panels damage my roof?
The installation must suit the roof and preserve its weather protection. Ask how its condition will be checked, how fixings will be sealed and who handles any resulting defect.
Can I install rooftop panels myself?
This guide describes a professional installation. Roof access, structural attachments and electrical connections need the appropriate competence. Discuss the complete project with a qualified solar installer.
Do I have to install a battery at the same time?
No. Solar can operate without storage. If you might add a battery later, ask about compatibility and future work before agreeing the initial design.
A good installation ends with a clear handover
The aim is a suitable, tested system you understand, backed by accessible documents and aftercare. Use the stages above to ask questions early. For help deciding whether solar suits your home, read our advantages and disadvantages of solar energy.
Sources and further reading
Sources reviewed 6 October 2026. This is a homeowner overview; requirements depend on location, equipment and the approved design. Manufacturer documents illustrate their own products.
- Energy Saving Trust: Rooftop installation guide
- Planning Portal: Solar planning permission (England)
- Planning Portal: Building regulations (England)
- National Grid Electricity Distribution: G99 procedures
- HSE: Work at height
- K2 Systems: Tiled-roof mounting
- LONGi: Module user manual
- US Department of Energy: PV system design basics
- Electrical Safety First: Solar panels
- MCS: Solar PV handover checklist
- Ofgem: Smart Export Guarantee
Explore the separate energy-information offer
Review the seller’s contents, price and terms before purchasing. This optional digital product is not an installation service, technical assessment or guarantee of savings.
View the energy offer — affiliate link