

How should you size a weekend shed solar kit?
Size the battery for the energy you need between dependable charging opportunities, then size the panels to replace that energy in the months you actually visit. Include inverter consumption, equipment left running during the week and a poor-weather fallback. A panel’s wattage and a battery’s amp-hour label cannot establish whether the complete kit will do the job.
A shed that works perfectly on a sunny Saturday can disappoint in October. The lights may still work, but a tool battery refuses to finish charging, or the inverter shuts down before you pack away. Often the problem is a mismatch between the weekend workload and the system’s ability to recover afterwards.
Weekend use gives you potentially useful charging time while you are away. It does not guarantee a full battery when you return. Start with the work you want to do, your visiting pattern and the least favourable season in which you expect normal service.
1. Define the weekend before choosing the kit
Write down arrival and departure times, the months you visit and what you expect to power. A summer gardening shed with lighting and one charger is different from a year-round workshop with a fridge, internet connection and regular power-tool use.
Separate essential tasks from optional ones. Could you charge tool batteries at home before a winter visit? Could laptop charging wait? These choices can reduce the required system size without compromising the main purpose of the shed.
Also distinguish energy from starting power. A short burst from a demanding motor can exceed an inverter’s capability even when the battery holds enough energy. Our shed inverter guide covers this separate sizing check.
2. Make a two-day energy budget
Watts describe power; watt-hours describe energy over time. Multiply average watts by operating hours, or use a suitable plug-in meter to measure a complete charging session. Avoid treating a tool battery’s printed capacity as the energy drawn from the socket: charging losses matter.
| Task | Assumed use | Weekend energy |
|---|---|---|
| LED lighting | 20W total for 8 hours | 160Wh |
| Tool-battery charging | Two sessions at 120Wh each | 240Wh |
| Laptop | 45W average for 4 hours | 180Wh |
| Radio | 10W for 6 hours | 60Wh |
| Total | Illustrative, not measured | 640Wh |
This budget excludes heating, a kettle, a fridge and large mains-powered tools. Add any equipment you actually intend to use. A “small” heater can dominate the energy budget even if it fits easily on a shelf.
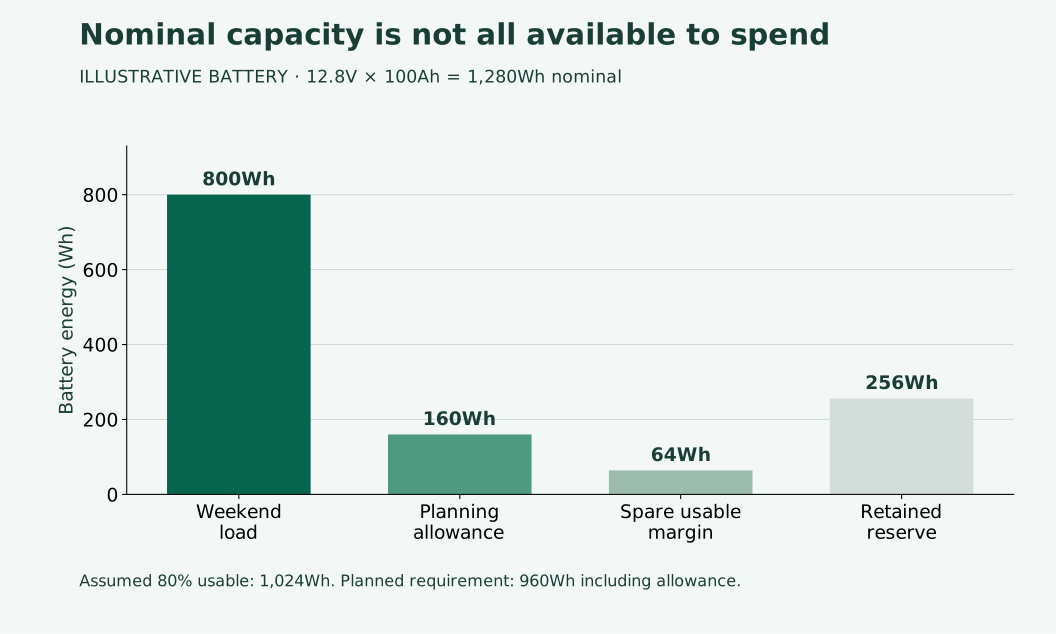
For this teaching example, assume an overall battery-to-appliance efficiency of 80% across the visit, including inverter overhead. The battery must supply 640Wh ÷ 0.80 = 800Wh. This assumed figure is not a universal inverter efficiency. Do not add idle consumption again when it is already included.
Our tool-battery charging guide helps refine that part of the list. Once a system is installed, battery-side monitoring can replace rough allowances with evidence from your own visits.
3. Convert demand into usable battery capacity
Nominal capacity is not the amount you should automatically plan to use. The permitted discharge range, temperature, age and battery instructions affect the usable amount. Set an operating reserve above emergency shutdown rather than planning to run until protection trips.
A simplified battery calculation
Take the example’s 800Wh battery demand and add an assumed 20% planning allowance: 800 × 1.20 = 960Wh usable energy required.
If the chosen battery permits an 80% usable operating window, the corresponding minimum nominal capacity is 960 ÷ 0.80 = 1,200Wh. These percentages are assumptions for the exercise, not settings to copy into your battery system.
A nominal 12.8V, 100Ah battery contains approximately 1,280Wh. At the assumed 80% usable fraction, that provides 1,024Wh, only 64Wh above our 960Wh planning requirement. It passes this simplified arithmetic, but temperature, ageing or extra loads could remove that small remaining margin.
Do not compare batteries by amp-hours alone. Voltage is part of the energy calculation. Check maximum discharge current and the battery management system too: adequate Wh capacity does not automatically mean adequate power for the inverter.
4. Test a dull weekend, not just a sunny one
For a simple first check, assume no useful solar contribution during the visit. Can the battery cover the planned workload from the intended starting charge while retaining its reserve? This avoids relying on Saturday sunshine to complete Saturday’s work.
That is a conservative test of weekend autonomy, not a requirement to ignore solar in every detailed model. A properly assessed system may use daytime production directly, but the design should make that dependency clear.
Ask what happens if you arrive below the target charge. Agree which tasks are postponed and what independent backup is available. Our poor-weather reserve guide explains why a practical fallback belongs alongside the equipment specification.
Optional paid reading: You can view the linked energy offer while exploring broader ideas. It is not a verified recommendation for a particular shed kit or battery size.
5. Check whether the battery recovers before next time
Suppose your normal visit removes 800Wh and you have five complete days before the next visit. With no continuing demand, you need to restore an average 160Wh per day to recover that energy.
Now add an assumed 2W of continuous battery-side demand while you are away. Over five days that uses 2W × 120 hours = 240Wh. Replacing both amounts requires 1,040Wh over those days, or 208Wh per day reaching the battery’s stored-energy balance before subtracting those background loads.
Check what remains powered: an inverter, controller, monitor, alarm or network connection. Their combined effect can be substantial over a week. Follow the documented shutdown arrangement; do not simply disconnect equipment that is needed for safe charging or protection.
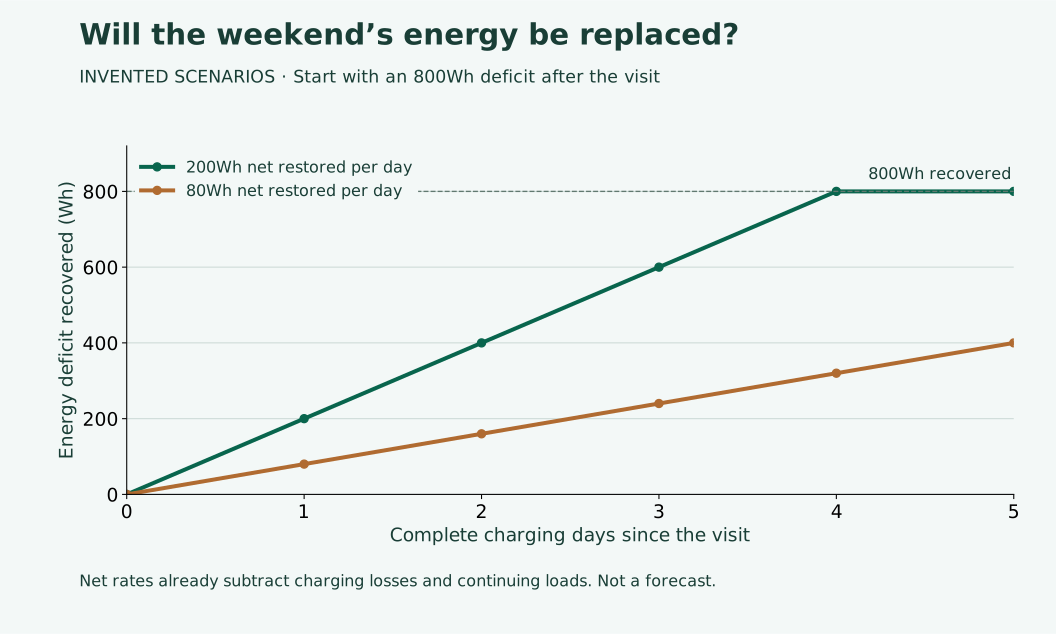
A larger battery can postpone a shortfall, but cannot correct a repeated energy deficit. If each week restores less than the previous visit consumed, the starting charge gradually falls. Our inverter overhead article helps identify avoidable background consumption.
6. Choose panels for your actual visiting season
Peak panel watts are a test-condition rating, not guaranteed output throughout daylight. For UK weekend use, compare monthly production at the proposed location and mounting position rather than choosing from an annual total or a memorable summer day.
The European Commission’s PVGIS off-grid tool models solar generation, battery storage and consumption, reporting monthly energy and battery-state statistics. Such modelling is more informative than assuming the same daily yield all year.
Here is a deliberately simplified panel calculation. To supply the example’s 208Wh daily replenishment requirement, assume 75% of rated-power-times-equivalent-sun-hours becomes stored energy. With one equivalent full-sun hour, the arithmetic gives 208 ÷ (1 × 0.75) ≈ 277W. With four equivalent hours, it gives about 69W.
Those sunlight values are invented scenarios, not weather data for your shed. An equivalent full-sun hour is an energy measure, not simply an hour between sunrise and sunset. The calculation demonstrates sensitivity to sunlight; it is not a recommendation to buy either panel size.
The PVGIS 5 manual describes a daily consumption input and a repeating 24-hour profile. Dividing a weekend total by seven would hide the concentrated draw. Ask for a chronological model of the actual visiting pattern where needed, and avoid adding losses twice to results that already include them.
7. Inspect shade and the winter battery environment
Record where shadows fall during the months you intend to visit. Nearby trees, fences and buildings can make a regional solar estimate a poor description of the actual roof. Our shed shade-mapping guide provides a practical starting point.
Check the battery’s permitted charging temperature. The Victron Lithium Smart manual, for example, permits charging between +5°C and +50°C and describes reduced capacity in cold conditions. Those limits apply to that product family; other batteries need their own instructions.
Sunshine does not guarantee charging if the battery is too cold. Do not bypass temperature protection. If a suitable system uses battery heating, include that energy in the budget. Our unheated battery-storage guide covers the questions to ask.
8. Make the complete kit work together
Ask the supplier to confirm panel, controller, battery and inverter compatibility. The Victron solar-charger installation guidance distinguishes PV voltage and current limits and notes the effect of cold conditions on open-circuit voltage. Matching the advertised wattage alone is insufficient.
Have roof strength, mounting, cable protection and electrical protection assessed for the actual shed. Leave fixed wiring and mains connections to a competent installer. Our lightweight shed-roof checklist helps prepare that conversation.
Before purchasing, ask for the usable battery capacity, expected seasonal recovery, peak-load capability and response to a poor charging week in writing. If you also inspect the seller’s energy presentation, verify its claims independently against these requirements.
Frequently asked questions
Will five days of charging always refill the battery?
No. It depends on sunlight, shade, charging limits, background demand and the energy removed. Check the least favourable months in which you need normal service.
Should I buy more panels or a bigger battery?
If a full battery cannot cover the visit, usable storage may be inadequate. If it covers the visit but fails to recover, generation or continuing demand needs attention. Sometimes both require changes.
Can I leave the inverter on all week?
Only if the system is intended for that operation and its consumption fits the budget. Otherwise, use the documented shutdown method while preserving required charging and protection functions.
What should I measure after installation?
Record arrival charge, energy used during the visit, departure charge and recovery before returning. Compare several weeks and repeat during a less sunny season.
Design for the next visit as well as this one
A useful weekend shed system carries you through the planned work and recovers reliably afterwards. Start with the energy budget, retain a battery reserve and test the recharge assumptions against the season. Summer performance alone cannot answer those questions.
The ECO-WORTHY 400W kit with a 100Ah LiFePO₄ battery is one package to compare against your weekend energy budget. Allow for usable battery capacity, charging between visits and poorer winter sunlight instead of relying on the seller’s headline daily yield.
For short visits where lighting is the main task, compare the Photonic Universe 15W solar lighting kit. Treat its advertised runtime as a starting point, then allow for the number of lamps used, winter charging and successive visits before the battery has recovered.
Explore the linked energy offer
Optional paid affiliate resource. We have not tested the product or verified its performance claims. Review the seller’s contents, price and terms before buying; it does not replace a site assessment or equipment manuals.
View the energy offer — affiliate linkSources and further reading
Checked 10 October 2026. Worked figures and graphics are illustrative calculations, not measured kit performance.